Showing posts with label activities. Show all posts

Friday, September 26, 2014

Tracing

Another way to trace a picture.

We are used to putting the picture on the window and tracing it that way.  Now I wanted to introduce another way to trace something.  Through rubbing.

So we took a coloring book page, rubbed pencil all over the back of the page.


Then flipped it over and traced over the lines of the picture.  Now it rubbed the pencil marks from the backside onto the paper underneath.  Then we can trace over it again to make it darker, and color it. :)


I forgot to take a picture after he traced it to make it darker.  But if you enlarge it you can see the pencil marks that transferred through.  Fun experiment for the kids.


Monday, October 17, 2011

Water Experiment

Soaking colors.

First we did a preliminary experiment where we put a dot of color on a small piece of coffee filter.


Then dipped the edge in a little bit of water.  And watched it absorb the water.


While it did that it pulled the color up with it.  Some colors stayed the same, while other colors that are blends, like black and brown, green etc....showed the hidden colors inside.

Here's all the soaked colors.
Can you tell which color is which?


I'll start with the top and go around clockwise.

Purple, Green, Brown, Blue, Red, Orange, Black.


Then we decided to turn it into a crafty project....click here to see what we did next!


Thursday, September 15, 2011

Paper Windows

The pilgrims didn't have glass so they had to do something to let some light in, but yet keep the bugs out.

We took a piece of paper, and rubbed some oil on both sides.  Then we held up a regular piece of paper verses this oiled piece to see which one let more light through.  We also sprayed water on them both to see which one withheld the water better.  Now you have an idea what the pilgrims windows were like.


 Towel for easier cleanup, oil of some kind and a regular piece of paper.


We really only needed one piece of paper to prove the point here, but I let them both have the whole messy enjoyment experience. :)

After rubbing the oil over the whole paper and both sides.  We held up the oiled piece of paper and a regular piece of paper to the window.  Now which one lets in more light?

And then we spritzed water on them both to see which one held up to the water(rain) better.


Not really a project you keep, yet a simple project for all to enjoy getting messy in!


Sunday, September 11, 2011

Stars

We did a couple simple little things to see the enormity of the stars.  First of all the closest star, the sun, which is 93 million miles away.  We talked about how far away the moon is, compared to the sun.

If you could travel at the speed of light it would only take you 2 seconds to get to the moon.  And 8 minutes to get to the sun.  So we drew a line in the driveway, and walked for 2 seconds to see where the moon is.  Then walked for 8 minutes to see where the sun is. 

Next we talked about how big the sun is.....and then comparing how large the next closest star is.  Which is 600 times the sun.  So we drew the sun to be 1 inch big outside, and then measured 600 inches away from that to see the size of that star, named Betelgeuse (pronounced Bettle Juice).  Now that's a big star!


For more on the solar system check out my solar system lapbook!


These simple activities are from our homeschool material, My Father's World.


Monday, August 29, 2011

Stained Glass Craft-Rehash

We did this well over a year ago.  This time we added to it.  Check it out!
First find a your old crayons and, with an adults help, make small little shavings of the crayon colors.

This time we cut out a word to put in the window....we cut out the name JESUS.

Use a towel (you don't care about) and place some newspaper on top.  Then put your wax paper on top, add your name/word, and start sprinkling your crayon shavings wherever.

When you are done, put another piece of wax paper over top of your wax paper/crayon decoration.  Then top that wax paper with more newspaper.

Next, with a warm iron, iron over the newspaper to melt the crayon wax and this melts the two sheets of wax paper together.

We then cut off the rough edges to make a square or rectangle shape. And added strips of construction paper (1 inch) to make a frame for our window.  We put the frame on both sides.


Display your art in the window to see it's true beauty!


Sunday, June 5, 2011

Object Lesson v1

This was a quick object lesson we did a while back with our story about Abraham and Isaac....and traveling through the dessert.

We talked about how God made the camels with big feet to help them not sink into the sand.

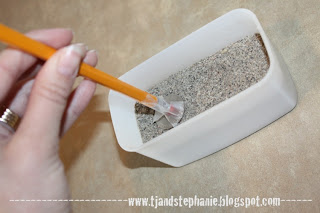
So first we used a pencil, and pushed it into the sand.  It was really easy to push down into the sand.


Then we taped a quarter to the bottom on the pencil making the wider "foot" and that was much harder to push into the sand.  It keep the pencil on top.  Just like the big feet of a camel help it not sink in the sand.


Monday, May 9, 2011

Letter R

Have fun with the Letter R!

Letter R Memory Verse
 “Remember the Sabbath day, to keep it holy." Exodus 20:8
A-Z Collage Sheets.
I printed these 2 up on a page.

We used the R that we already had printed from our A-Z Collage Sheets.
I got these wooden blocks from hobby lobby, and had him place them on the letter shape.  
Just another way to have fun while learning how to shape the letter R!
After doing this all week, I had him do it the last day with out the paper underneath.
Color puzzle.  Download the file here.
I printed them 2 up to make them smaller and to use less ink and paper. :)

I put them in a sheet protector so he can use the same sheet every day of the week!

Letter Hunt Worksheets.  Download the file here.
Print and use a sheet protector so you can do it every day of the week.

 Using the Rainbow color match to put in the rainbow color order.

 Letter R size Sort.  Download the file here.

Letter R Puzzle.
(I used the A-Z large floor mats as puzzles) 
This way it doesn't have the lines already in the file and you can cut it however you want.  I wanted to do at least 8 pieces.  I might change it up to more or different shapes or something for a later puzzle...we will see!

 Letter R cutting practice.  Download the file here.

This is different than most the rest...you can cut in half and make the counting cards into a puzzle type of game also. 
Use these in 3 different ways.  First you can just put them in numerical order.  Then I have larger clothes pins that I have written numbers on, so they use those to match the number.  And then I bought some smaller clothes pins and that one he puts that many pins on the number card.  
We also lined them up this way and counted by 2's!
See all these examples in picture form in the Number Order Games Post.

Letter Matching.  Download the file here.
Print the letters only once with all these files.  I just laminated the letters instead of attaching them to anything else.  This still makes them durable and long lasting. :)

Capital/Lowercase Sorting.  Download the file here.
 Print smaller size to save on ink and lamination. :)

Roll a Rainbow.  These games are my son's favorite. :)
Download the file here.

Download the file here.
We used our homemade pompom magnets for these.
 We got these rocks while we were in Duluth.  There were all these different colors as we walked along the shore so I brought them home for the kids.  First of all they love playing with rocks and they are free.  So you can't beat that.  Plus I knew we were going to work on the rainbow so this was perfect.

 And then we used those blocks and put them in rainbow color order.  Fun little activities. :)

 Coloring our own rainbow.


I made my own circle the letter files.  (example shown)
Download my A-Z Circle the letter file.
You can print them full page or 2 up.  
We used pencil on this and did it as a one time use.
 Or you could put them in sheet protectors and do the same sheet over and over again. :)

(no picture this time)
Read Chicka Chicka Boom Boom every day.  
And at the end of the week put the letter R on your coconut tree!  
I used the A-Z Collage Sheets.
I put them 4 up on a page so the letter would be small enough for 
them all to fit on our little coconut tree. 
 
(you're right, I didn't take a new picture so pretend it's the letter R!)
I made this file myself because I wanted all the letters in one file.
Download my A-Z poke it letter file here.  
Take a thumb tack and poke the letter R.    
Make sure to do this while on the carpeted floor. :)
Capital letter file.  Lowercase letter file.
Have fun aiming for the letter R! 
(Yes, I'm not going to take new pictures each time so pretend the bean bag landed on the letter R!)
Alphabet Sorting.  Download the printable file here.

And just for fun, a beautiful rainbow we had outside our house this last week! 


Wow, isn't God amazing?!
 

You might also like these posts.

Related Posts Plugin for WordPress, Blogger...